本文章根据 Android 27.1.1 的 AppCompatActivity 研读,比 Activity 实现源码更复杂。
一、Activity
mWindow 是 Activity 的数据成员,类型是 Window。
1
2
3
4
5
6
7
8
9
10
11
public class Activity extends ContextThemeWrappers
        implements LayoutInflater.Factory2,
        Window.Callback, KeyEvent.Callback,
        OnCreateContextMenuListener, ComponentCallbacks2,
        Window.OnWindowDismissedCallback, WindowControllerCallback,
        AutofillManager.AutofillClient {

    private Window mWindow;

    .....
}
PhoneWindow 是 Window 的具体实现。mDecor 为 DecorView 类型的成员 ,是界面的根布局。
1
2
3
4
5
6
7
8
public class PhoneWindow extends Window implements MenuBuilder.Callback{
    .....

    // This is the top-level view of the window, containing the window decor.
    private DecorView mDecor;

    .....
}
二、AppCompatActivity
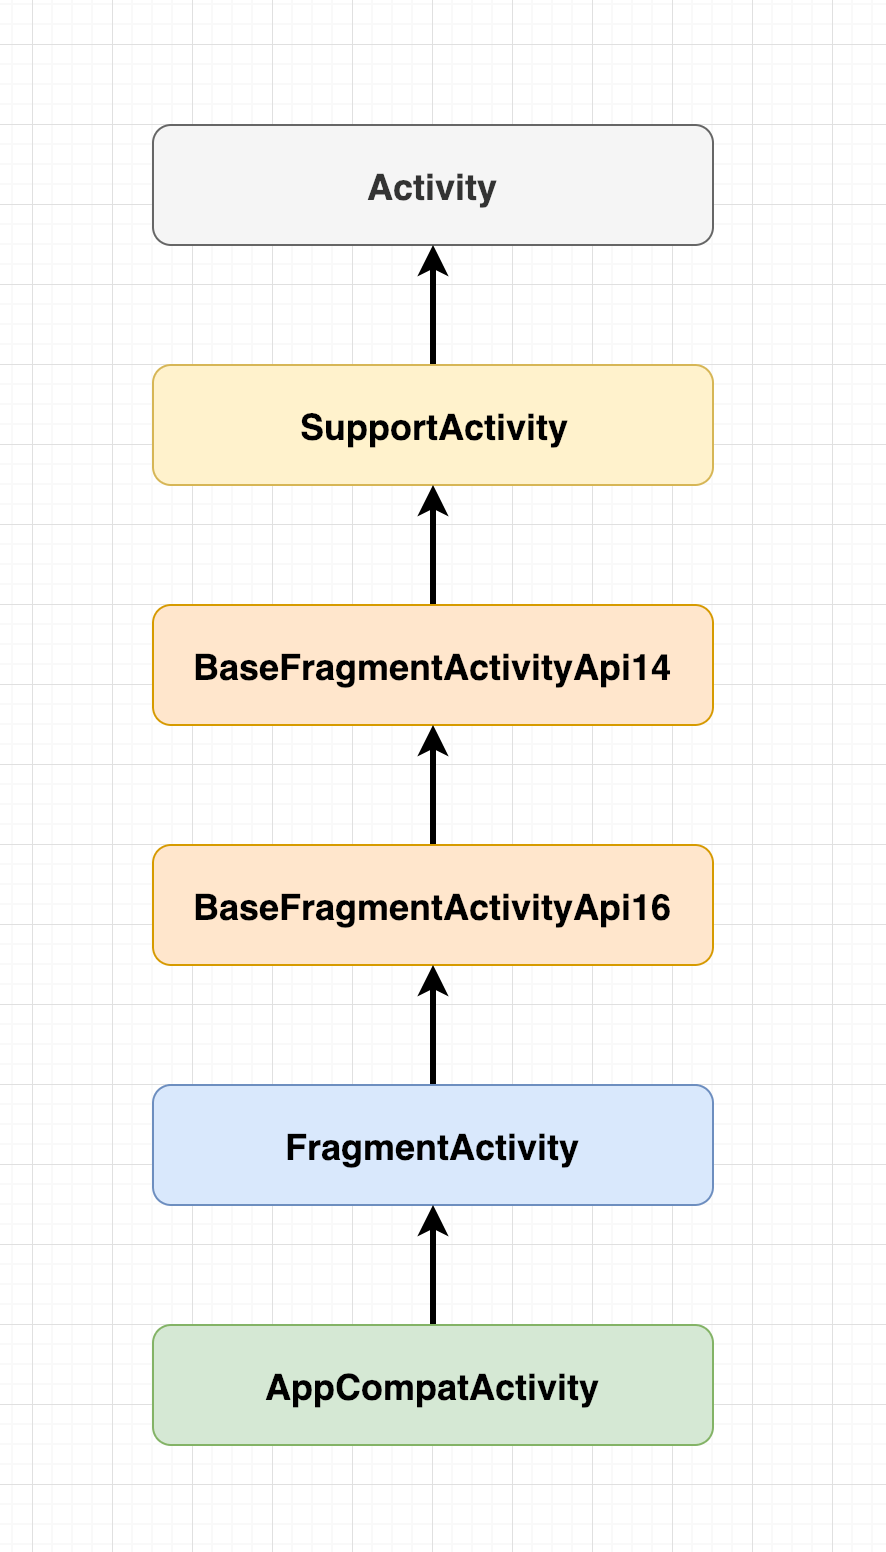
AppCompatActivity 继承关系:
AppCompatActivity 重写 Activity.setContentView() 方法,把相关工作交给代理类完成。本文分析流程将沿着代理类的实现进行解释。
1
2
3
4
@Override
public void setContentView(@LayoutRes int layoutResID) {
    getDelegate().setContentView(layoutResID);
}
通过单例模式获取代理类 AppCompatDelegate 实例。
1
2
3
4
5
6
7
@NonNull
public AppCompatDelegate getDelegate() {
    if (mDelegate == null) {
        mDelegate = AppCompatDelegate.create(this, this);
    }
    return mDelegate;
}
三、AppCompatDelegate
代理实现类没有看见 AppCompatDelegateImplV9 的分支
1
2
3
4
5
6
7
8
9
10
private static AppCompatDelegate create(Context context, Window window,
        AppCompatCallback callback) {
    if (Build.VERSION.SDK_INT >= 24) {
        return new AppCompatDelegateImplN(context, window, callback);
    } else if (Build.VERSION.SDK_INT >= 23) {
        return new AppCompatDelegateImplV23(context, window, callback);
    } else {
        return new AppCompatDelegateImplV14(context, window, callback);
    }
}
AppCompatDelegateImplV14 继承自 AppCompatDelegateImplV9,可知v23以下工作都交给v14处理。
1
2
3
4
@RequiresApi(14)
class AppCompatDelegateImplV14 extends AppCompatDelegateImplV9 {
    ....
}
代理实现的 setContentView() 位于 AppCompatDelegateImplV9,其他子类没有重写这个方法。
1
2
3
4
5
6
7
8
9
10
11
12
13
@Override
public void setContentView(int resId) {
    // 先初始化SubDecor
    ensureSubDecor();
    // mSubDecor里获取名为android.R.id.content的ViewGroup
    ViewGroup contentParent = (ViewGroup) mSubDecor.findViewById(android.R.id.content);
    // 移除contentParent里所有视图
    contentParent.removeAllViews();
    // 传入的resId在这里填充并添加到contentParent
    LayoutInflater.from(mContext).inflate(resId, contentParent);
    // 通知Window
    mOriginalWindowCallback.onContentChanged();
}
3.1 ensureSubDecor()
标记 Window 的 subDecor 布局是否已经装载标志位,变量位于 AppCompatDelegateImplV9
1
private boolean mSubDecorInstalled;
setContentView() 调用 ensureSubDecor() 流程中,最重要的方法是 createSubDecor() 。
如果多次调用 setContentView(int resId) 方法,则后续 mSubDecorInstalled 标志位为 true 而不重复初始化 SubDecor。
1
2
3
4
5
6
7
8
9
10
11
12
13
14
15
16
17
18
19
20
21
22
23
24
25
26
27
28
29
30
31
private void ensureSubDecor() {
    // 先检查标志位,避免SubDecor重复初始化
    if (!mSubDecorInstalled) {
        // 构建SubDecor
        mSubDecor = createSubDecor();

        // 如果在decor之前已经配置标题,则在decor装载完毕后使用这个标题
        CharSequence title = getTitle();
        if (!TextUtils.isEmpty(title)) {
            onTitleChanged(title);
        }

        applyFixedSizeWindow();

        // 空实现,里面没有逻辑
        onSubDecorInstalled(mSubDecor);

        // 标记SubDecor已装载
        mSubDecorInstalled = true;

        // Invalidate if the panel menu hasn't been created before this.
        // Panel menu invalidation is deferred avoiding application onCreateOptionsMenu
        // being called in the middle of onCreate or similar.
        // A pending invalidation will typically be resolved before the posted message
        // would run normally in order to satisfy instance state restoration.
        PanelFeatureState st = getPanelState(FEATURE_OPTIONS_PANEL, false);
        if (!isDestroyed() && (st == null || st.menu == null)) {
            invalidatePanelMenu(FEATURE_SUPPORT_ACTION_BAR);
        }
    }
}
3.2 createSubDecor()
上述 mSubDecorInstalled 为 false 则创建 SubDecor
1
2
3
4
5
6
7
8
9
10
11
12
13
14
15
16
17
18
19
20
21
22
23
24
25
26
27
28
29
30
31
32
33
34
35
36
37
38
39
40
41
42
43
44
45
46
47
48
49
50
51
52
53
54
55
56
57
58
59
60
61
62
63
64
65
66
67
68
69
70
71
72
73
74
75
76
77
78
79
80
81
82
83
84
85
86
87
88
89
90
91
92
93
94
95
96
97
98
99
100
101
102
103
104
105
106
107
private ViewGroup createSubDecor() {
    TypedArray a = mContext.obtainStyledAttributes(R.styleable.AppCompatTheme);

    if (!a.hasValue(R.styleable.AppCompatTheme_windowActionBar)) {
        a.recycle();
        // AppCompatActivity需配合Theme.AppCompat使用,否则会抛出以下异常
        throw new IllegalStateException(
                "You need to use a Theme.AppCompat theme (or descendant) with this activity.");
    }

    // 从主题获取样式,并通过requestWindowFeature()把对应属性标为true
    if (a.getBoolean(R.styleable.AppCompatTheme_windowNoTitle, false)) {
        requestWindowFeature(Window.FEATURE_NO_TITLE);
    } else if (a.getBoolean(R.styleable.AppCompatTheme_windowActionBar, false)) {
        requestWindowFeature(FEATURE_SUPPORT_ACTION_BAR);
    }
    if (a.getBoolean(R.styleable.AppCompatTheme_windowActionBarOverlay, false)) {
        requestWindowFeature(FEATURE_SUPPORT_ACTION_BAR_OVERLAY);
    }
    if (a.getBoolean(R.styleable.AppCompatTheme_windowActionModeOverlay, false)) {
        requestWindowFeature(FEATURE_ACTION_MODE_OVERLAY);
    }
    mIsFloating = a.getBoolean(R.styleable.AppCompatTheme_android_windowIsFloating, false);
    a.recycle();

    // 创建DecorView并装载到Window,实现类是PhoneWindow
    mWindow.getDecorView();

    final LayoutInflater inflater = LayoutInflater.from(mContext);
    ViewGroup subDecor = null;

    // 由主题配置决定使用的布局,填充视图赋值给subDecor
    if (!mWindowNoTitle) {
        if (mIsFloating) {
                // 根据样式选择布局并初始化subDecor
                subDecor = (ViewGroup) inflater.inflate(R.layout.abc_dialog_title_material, null);

                // 悬浮windows没有action bar,重置该标志位
                mHasActionBar = mOverlayActionBar = false;
        } else if (mHasActionBar) {
            .....
        }
    } else {
        .....
    }

    // 上面配置设置完毕后subDecor不能为空
    if (subDecor == null) {
        throw new IllegalArgumentException(
                "AppCompat does not support the current theme features: { "
                        + "windowActionBar: " + mHasActionBar
                        + ", windowActionBarOverlay: "+ mOverlayActionBar
                        + ", android:windowIsFloating: " + mIsFloating
                        + ", windowActionModeOverlay: " + mOverlayActionMode
                        + ", windowNoTitle: " + mWindowNoTitle
                        + " }");
    }

    if (mDecorContentParent == null) {
        mTitleView = (TextView) subDecor.findViewById(R.id.title);
    }

    // Make the decor optionally fit system windows, like the window's decor
    ViewUtils.makeOptionalFitsSystemWindows(subDecor);

    final ContentFrameLayout contentView = (ContentFrameLayout) subDecor.findViewById(
            R.id.action_bar_activity_content);

    // 从PhoneWindow中获取content布局对象
    final ViewGroup windowContentView = (ViewGroup) mWindow.findViewById(android.R.id.content);

    if (windowContentView != null) {
        // 把PhoneWindow的视图放入subDecor的contentView
        while (windowContentView.getChildCount() > 0) {
            final View child = windowContentView.getChildAt(0);
            windowContentView.removeViewAt(0);
            contentView.addView(child);
        }

        // 把PhoneWindow名为android.R.id.content视图的id去掉
        windowContentView.setId(View.NO_ID);
        // 设置SubDecor.contentView的id为android.R.id.content
        // 相当于PhoneWindow把同名id让给subDecor的子视图使用
        contentView.setId(android.R.id.content);

        // The decorContent may have a foreground drawable set (windowContentOverlay).
        // Remove this as we handle it ourselves
        if (windowContentView instanceof FrameLayout) {
            ((FrameLayout) windowContentView).setForeground(null);
        }
    }

    // 还要把subDecor加到PhoneWindow作为子视图
    mWindow.setContentView(subDecor);

    contentView.setAttachListener(new ContentFrameLayout.OnAttachListener() {
        @Override
        public void onAttachedFromWindow() {}

        @Override
        public void onDetachedFromWindow() {
            dismissPopups();
        }
    });

    return subDecor;
}
如果什么样式都没有配置,subDecor 会默认选择 R.layout.screen_simple 作为布局。从以下xml布局可见里面id为 content 的视图为 FrameLayout,里面保存着我们填充的 Activity 布局。这个也是赋值给 mContentParent 的视图。
1
2
3
4
5
6
7
8
9
10
11
12
13
14
15
16
17
18
19
20
21
<LinearLayout xmlns:android="http://schemas.android.com/apk/res/android"
    android:layout_width="match_parent"
    android:layout_height="match_parent"
    android:fitsSystemWindows="true"
    android:orientation="vertical">

    <ViewStub android:id="@+id/action_mode_bar_stub"
              android:inflatedId="@+id/action_mode_bar"
              android:layout="@layout/action_mode_bar"
              android:layout_width="match_parent"
              android:layout_height="wrap_content"
              android:theme="?attr/actionBarTheme" />

    <FrameLayout
         android:id="@android:id/content"
         android:layout_width="match_parent"
         android:layout_height="match_parent"
         android:foregroundInsidePadding="false"
         android:foregroundGravity="fill_horizontal|top"
         android:foreground="?android:attr/windowContentOverlay" />
</LinearLayout>
3.3 requestWindowFeature()
从主题获取样式 featureId,由此id决定特性是否开启
1
2
3
4
5
6
7
8
9
10
// true if this activity has an action bar.
boolean mHasActionBar;
// true if this activity's action bar overlays other activity content.
boolean mOverlayActionBar;
// true if this any action modes should overlay the activity content
boolean mOverlayActionMode;
// true if this activity is floating (e.g. Dialog)
boolean mIsFloating;
// true if this activity has no title
boolean mWindowNoTitle;
由 requestWindowFeature 修改上述布尔值
1
2
3
4
5
6
7
8
9
10
11
12
13
14
15
16
17
18
19
20
21
22
23
24
25
26
27
28
29
30
31
32
33
34
35
36
37
38
39
40
41
@Override
public boolean requestWindowFeature(int featureId) {
    featureId = sanitizeWindowFeatureId(featureId);

    if (mWindowNoTitle && featureId == FEATURE_SUPPORT_ACTION_BAR) {
        return false; // Ignore. No title dominates.
    }
    if (mHasActionBar && featureId == Window.FEATURE_NO_TITLE) {
        // Remove the action bar feature if we have no title. No title dominates.
        mHasActionBar = false;
    }

    switch (featureId) {
        case FEATURE_SUPPORT_ACTION_BAR:
            throwFeatureRequestIfSubDecorInstalled();
            mHasActionBar = true;
            return true;
        case FEATURE_SUPPORT_ACTION_BAR_OVERLAY:
            throwFeatureRequestIfSubDecorInstalled();
            mOverlayActionBar = true;
            return true;
        case FEATURE_ACTION_MODE_OVERLAY:
            throwFeatureRequestIfSubDecorInstalled();
            mOverlayActionMode = true;
            return true;
        case Window.FEATURE_PROGRESS:
            throwFeatureRequestIfSubDecorInstalled();
            mFeatureProgress = true;
            return true;
        case Window.FEATURE_INDETERMINATE_PROGRESS:
            throwFeatureRequestIfSubDecorInstalled();
            mFeatureIndeterminateProgress = true;
            return true;
        case Window.FEATURE_NO_TITLE:
            throwFeatureRequestIfSubDecorInstalled();
            mWindowNoTitle = true;
            return true;
    }

    return mWindow.requestFeature(featureId);
}
四、PhoneWindow
Window 是 PhoneWindow 的父类,定义一些列绘制窗口的抽象方法,作为顶级视图添加到 window manager。
1
2
3
4
5
6
7
8
9
10
11
// Abstract base class for a top-level window look and behavior policy.  An
// instance of this class should be used as the top-level view added to the
// window manager. It provides standard UI policies such as a background, title
// area, default key processing, etc.
//
// <p>The only existing implementation of this abstract class is
// android.view.PhoneWindow, which you should instantiate when needing a
// Window.
public abstract class Window {
    .....
}
4.1 getDecorView()
检查是否已经创建 mDecor
1
2
3
4
5
6
7
@Override
public final View getDecorView() {
    if (mDecor == null || mForceDecorInstall) {
        installDecor();
    }
    return mDecor;
}
4.2 installDecor()
如果 mDecor 没有创建,则必须先创建 DecorView 并赋值
1
2
3
4
5
6
7
8
9
10
11
12
13
14
15
16
17
18
19
20
21
22
23
24
private void installDecor() {
    mForceDecorInstall = false;
    if (mDecor == null) {
        // 返回DecorView实例并赋值给mDecor,具体看下文
        mDecor = generateDecor(-1);
        mDecor.setDescendantFocusability(ViewGroup.FOCUS_AFTER_DESCENDANTS);
        mDecor.setIsRootNamespace(true);
        if (!mInvalidatePanelMenuPosted && mInvalidatePanelMenuFeatures != 0) {
            mDecor.postOnAnimation(mInvalidatePanelMenuRunnable);
        }
    } else {
        // DecorView保存了PhoneWindow的实例
        mDecor.setWindow(this);
    }

    // Decor已经装载完毕,开始初始化mContentParent
    if (mContentParent == null) {
        // 返回布局内id名为content的布局并赋值到mContentParent
        mContentParent = generateLayout(mDecor);

        .....
        .....
    }
}
4.3 generateDecor(featureId)
创建 DecorView 实例
1
2
3
4
5
6
7
8
9
10
11
12
protected DecorView generateDecor(int featureId) {
    // System process doesn't have application context and in that case we need to directly use
    // the context we have. Otherwise we want the application context, so we don't cling to the
    // activity.
    Context context;
    // 处理Context和主题相关逻辑,省略
    if (mUseDecorContext) {
        .....
    }
    // 创建新DecorView
    return new DecorView(context, featureId, this, getAttributes());
}
4.4 generateLayout(DecorView decor)
DecorView 创建完成赋值给 mDecor。本方法根据窗口的风格样式,选择窗口对应的资源根布局文件,作为 mDecor 的子布局进行添加。
然后从这个布局里面,获取id名为 content 的 FrameLayout 赋值给 mContentParent 变量。对比 mContentRoot,mContentRoot 其实就是 mContentParent 所在的父布局。
1
2
3
4
5
6
7
8
9
10
11
12
13
14
15
16
17
18
19
20
21
22
23
24
25
26
27
28
29
30
31
32
33
34
35
36
37
38
39
40
41
42
43
44
45
46
47
48
49
50
51
52
53
54
55
56
57
58
59
60
61
62
63
64
65
66
67
68
69
70
71
72
73
74
75
76
77
78
79
80
81
82
83
84
85
protected ViewGroup generateLayout(DecorView decor) protected ViewGroup generateLayout(DecorView decor) {
    // Apply data from current theme.

    TypedArray a = getWindowStyle();

    // 读取xml样式里相关配置信息
    mIsFloating = a.getBoolean(R.styleable.Window_windowIsFloating, false);
    int flagsToUpdate = (FLAG_LAYOUT_IN_SCREEN|FLAG_LAYOUT_INSET_DECOR)
            & (~getForcedWindowFlags());
    if (mIsFloating) {
        setLayout(WRAP_CONTENT, WRAP_CONTENT);
        setFlags(0, flagsToUpdate);
    } else {
        setFlags(FLAG_LAYOUT_IN_SCREEN|FLAG_LAYOUT_INSET_DECOR, flagsToUpdate);
    }

    if (a.getBoolean(R.styleable.Window_windowNoTitle, false)) {
        requestFeature(FEATURE_NO_TITLE);
    } else if (a.getBoolean(R.styleable.Window_windowActionBar, false)) {
        // Don't allow an action bar if there is no title.
        requestFeature(FEATURE_ACTION_BAR);
    }

    // 这里省略类似上面这种配置处理的代码
    .....
    .....

    if (params.windowAnimations == 0) {
        params.windowAnimations = a.getResourceId(
                R.styleable.Window_windowAnimationStyle, 0);
    }

    // The rest are only done if this window is not embedded; otherwise,
    // the values are inherited from our container.
    if (getContainer() == null) {
        if (mBackgroundDrawable == null) {
            if (mBackgroundResource == 0) {
                mBackgroundResource = a.getResourceId(
                        R.styleable.Window_windowBackground, 0);
            }
            if (mFrameResource == 0) {
                mFrameResource = a.getResourceId(R.styleable.Window_windowFrame, 0);
            }
            mBackgroundFallbackResource = a.getResourceId(
                    R.styleable.Window_windowBackgroundFallback, 0);
        }
        if (mLoadElevation) {
            mElevation = a.getDimension(R.styleable.Window_windowElevation, 0);
        }
        mClipToOutline = a.getBoolean(R.styleable.Window_windowClipToOutline, false);
        mTextColor = a.getColor(R.styleable.Window_textColor, Color.TRANSPARENT);
    }

    // 通过设置的features决定layoutResource的id
    int layoutResource;
    // 除了xml样式,通过代码也能完成相关配置,这里读取代码实现的配置
    int features = getLocalFeatures();

    // 特性读取完成后,根据设置选择对应layoutResource
    if ((features & (1 << FEATURE_SWIPE_TO_DISMISS)) != 0) {
        layoutResource = R.layout.screen_swipe_dismiss;
        setCloseOnSwipeEnabled(true);
    } else if ((features & ((1 << FEATURE_LEFT_ICON) | (1 << FEATURE_RIGHT_ICON))) != 0) {
        ..... // 省略类似的条件判断选择
        .....
    }

    mDecor.startChanging();
    // 用layoutResource构建布局并加入到mDecor
    mDecor.onResourcesLoaded(mLayoutInflater, layoutResource);

    // 从mDecor内查找id为content的子视图
    ViewGroup contentParent = (ViewGroup)findViewById(ID_ANDROID_CONTENT);
    if (contentParent == null) {
        throw new RuntimeException("Window couldn't find content container view");
    }

    .....
    .....

    mDecor.finishChanging();

    // 返回contentParent
    return contentParent;
}
installDecor() 中调用 generateDecor() 和 generateLayout,完成构建 DecorView 实例,并把其子视图内名为 content 的视图绑定到变量 mContentParent 。
4.5 onResourcesLoaded
这个方法负责把 layoutResource 构建为视图,加入到 DecorView
1
2
3
4
5
6
7
8
9
10
11
12
13
14
15
16
17
18
19
20
21
22
23
24
25
26
27
28
29
30
void onResourcesLoaded(LayoutInflater inflater, int layoutResource) {
    if (mBackdropFrameRenderer != null) {
        loadBackgroundDrawablesIfNeeded();
        mBackdropFrameRenderer.onResourcesLoaded(
                this, mResizingBackgroundDrawable, mCaptionBackgroundDrawable,
                mUserCaptionBackgroundDrawable, getCurrentColor(mStatusColorViewState),
                getCurrentColor(mNavigationColorViewState));
    }

    mDecorCaptionView = createDecorCaptionView(inflater);
    // 样式决定layoutResource,填充对应视图
    final View root = inflater.inflate(layoutResource, null);
    if (mDecorCaptionView != null) {
        if (mDecorCaptionView.getParent() == null) {
            // mDecorCaptionView加入到DecorView
            addView(mDecorCaptionView,
                    new ViewGroup.LayoutParams(MATCH_PARENT, MATCH_PARENT));
        }
        // root加到mDecorCaptionView,所以root是DecorView的子视图,布局参数为MATCH_PARENT
        mDecorCaptionView.addView(root,
                new ViewGroup.MarginLayoutParams(MATCH_PARENT, MATCH_PARENT));
    } else {
        // 填充layoutResource获得的视图添加到DecorView
        // Put it below the color views.
        addView(root, 0, new ViewGroup.LayoutParams(MATCH_PARENT, MATCH_PARENT));
    }
    // 赋值给mContentRoot
    mContentRoot = (ViewGroup) root;
    initializeElevation();
}
前文提到,Activity主题样式决定 layoutResource 所指布局,一般通过 xml 指定样式:
1
android:theme="@style/Theme.AppCompat.Light.NoActionBar"
requestWindowFeature() 配置相关参数,由 getLocalFeature() 负责处理
1
requestWindowFeature(Window.FEATURE_NO_TITLE);
五、填充布局
经过上面 DecorView 创建和初始化的论述,现在回到原来关注的调用点上。随后填充视图并加入到 contentParent,这个视图就是日常使用的 setContentView(int resId) 的 resId
1
2
3
4
5
6
7
8
9
10
11
@Override
public void setContentView(int resId) {
    ensureSubDecor();
    // mSubDecor里获取名为android.R.id.content的ViewGroup
    ViewGroup contentParent = (ViewGroup) mSubDecor.findViewById(android.R.id.content);
    // 移除contentParent里所有已有的视图
    contentParent.removeAllViews();
    // 传入的Activity resId在这里填充并加入到contentParent
    LayoutInflater.from(mContext).inflate(resId, contentParent);
    mOriginalWindowCallback.onContentChanged();
}
工作完成,回调 onContentChanged() 发出通知,而 Activity 基类实现为空逻辑。
1
2
public void onContentChanged() {
}
六、总结
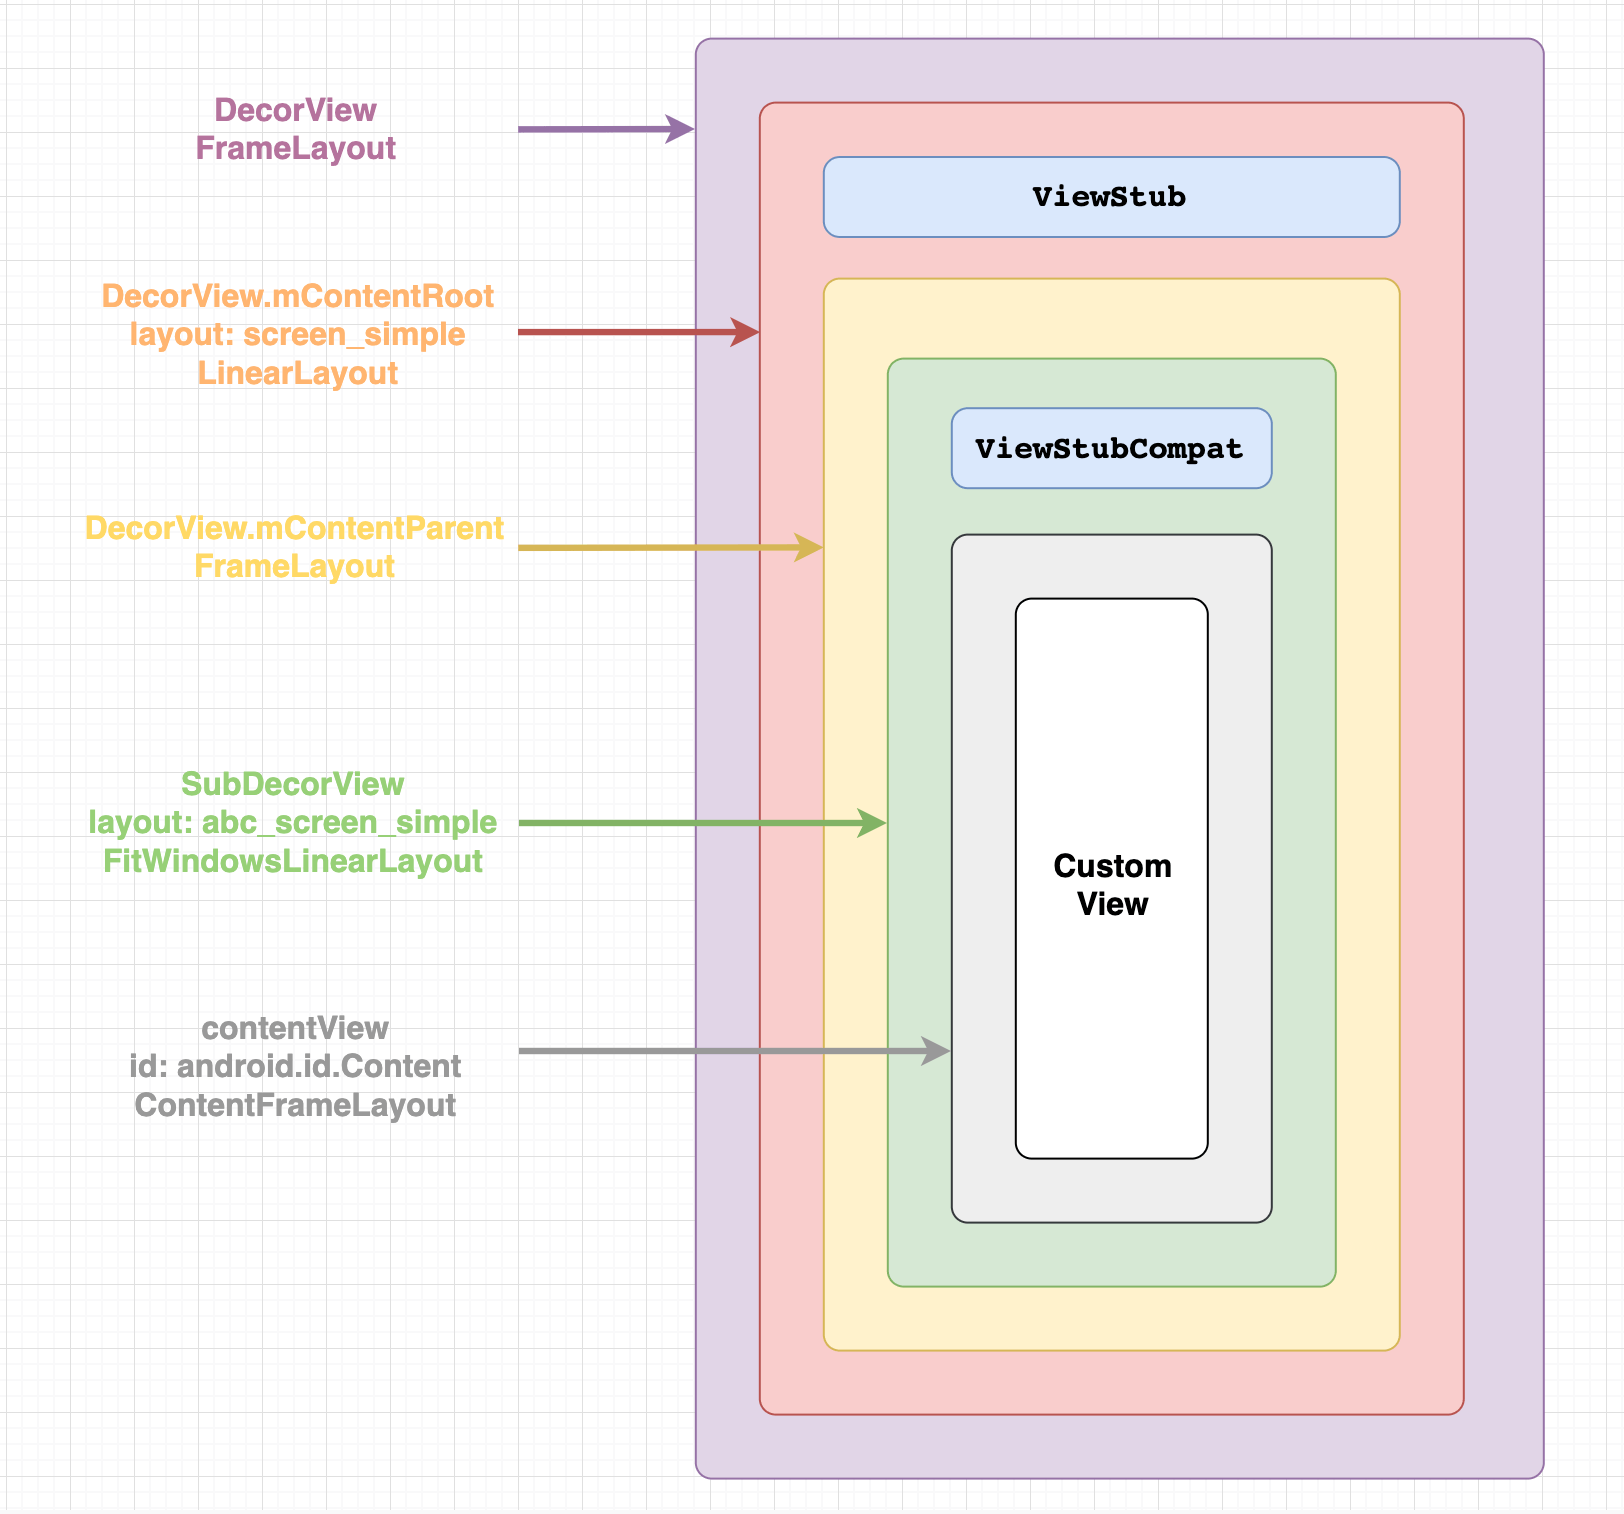
假设 ContentRoot 布局为 R.layout.screen_simple,SubDecorView 布局为 R.layout.abc_screen_simple,均为最简单的默认布局,则填充完成的效果如下:
setContentView(int resId) 工作流程:
- Activity 的 mWindow 已提前初始化为 PhoneWindow 类型实例;
- Activity 把 PhoneWindow 的配置工作交给代理进行;
- 代理给 PhoneWindow 的 mDecor 创建 DecorView 实例;
- 并根据 Activity 主题样式选择 layoutResource,填充后赋值给 mContentRoot;
- 把 mContentRoot 加到 PhoneWindow 的 mDecor 作为子视图;
- 创建 contentParent 加到 mContentRoot 作为字数图;
- 在 mDecor 找一个 id 为 android.R.id.content 的视图赋值给 contentParent;
- 最后,根据开发者定义的布局 resId,实例化后加到 contentParent 内.