一、前言
在网上搜索相关主题,大家千篇一律使用9-Patch图片作为气泡背景,效果不好还存在不少问题。
9-Patch本质是用图片作为背景,只是这张图片在设置的某些像素点上重复绘制达到拉伸效果。因为Android屏幕碎片化原因,所以一张9-Patch不能适配所有屏幕,至少需要分别适配 xhdpi 和 xxhdpi。
虽然每张9-Patch体积不大,但扩展到 不同场景要求不同圆角、点击气泡时背景交互色变化、更加精细的屏幕适配,需要多款相似而各有差别的图片集,最终累积成可观的安装包大小。其次用9-Patch作为消息气泡,气泡描边的视觉效果相当糟糕,在实战中已得到充分验证。
效果最好莫过于通过代码实现背景,填充颜色纯正,能自动根据屏幕缩放。Shape 样式难以绘制箭头,仅能实现描边和填充颜色,所以最好通过代码实现。
二、方向枚举
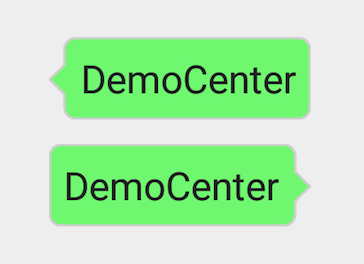
设置箭头的朝向,默认定义两个方向: START 为箭头朝左, END 为箭头朝右。
1
enum class DIRECTION { START, END }
当然还可以根据需要增加朝上和朝下。虽然在Android中不建议使用枚举类,但用Android官方推荐的方法时,需要依赖的注解和Kotlin存在兼容性问题,所以这里依然使用枚举类。
三、构造方法
继承父类 Shape
1
2
3
4
5
6
7
8
class BubbleShape constructor(var arrowDirection: DIRECTION,
                              @ColorInt var solidColor: Int,
                              @ColorInt var strokeColor: Int,
                              var strokeWidth: Int,
                              var cornerRadius: Int,
                              var arrowWidth: Int,
                              var arrowHeight: Int,
                              var arrowMarginTop: Int) : Shape()
变量名能清晰描述变量本身作用,这三个需额外解释:
- arrowWidth 是箭头的水平宽度;
- arrowHeight 箭头的垂直高度;
- arrowMarginTop 是箭头上角距离(左或右)上方圆角的垂直高度;
通过规定矩形的宽度和高度能画出固定宽高的三角形。
四、数据成员
1
2
3
4
5
6
7
8
9
10
11
12
13
14
15
16
17
18
19
20
// 气泡上部区域的path
private val mUpperPath = Path()

// 气泡下部区域的path
private val mLowerPath = Path()

// 修正绘制stroke的偏差
private var mStrokeOffset = (strokeWidth ushr 1).toFloat()

// 修正绘制radius的偏差
private var mRadiusOffset = (cornerRadius ushr 1).toFloat()

// 预先计算以减少计算量:箭头上角到气泡顶部高度,NA:NoneArrow
private val mUpperHeightNA = cornerRadius + arrowMarginTop + mStrokeOffset

// 预先计算以减少计算量:箭头上角到气泡顶部高度 + 半个箭头的高度,HA:HalfArrow
private val mUpperHeightHA = mUpperHeightNA + (arrowHeight ushr 1).toFloat()

// 预先计算以减少计算量:箭头上角到气泡顶部高度 + 整个箭头的高度,FA:FullArrow
private val mUpperHeightFA = mUpperHeightNA + arrowHeight
五、重写resize()
5.1 如何绘制
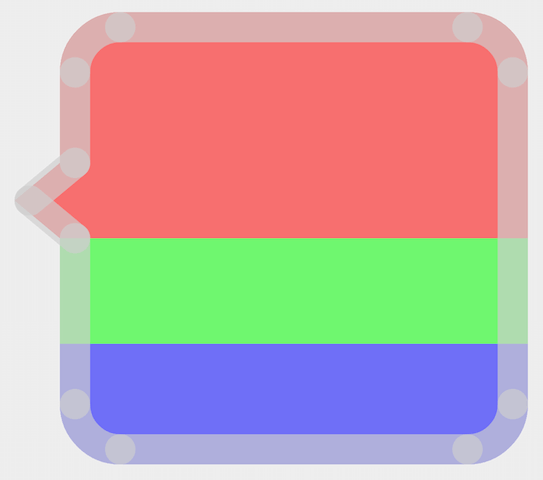
为了绘制方便,把一个气泡分为三部分分别处理。下图三个部分用不同的颜色填充,描边加粗并使用半透明的白色以便区分。

5.2 onResize()
由于具体宽度和气泡内部 TextView 文字有关,所以需要重写方法实时计算宽高值。此方法中计算 气泡上部path 和 气泡下部path 。此外还有气泡中部,不过中部纯粹为一个的矩形,计算好高度直接绘制即可。
1
2
3
4
override fun onResize(width: Float, height: Float) {
    resizeTopPath(width)
    resizeBottomPath(width, height)
}
5.3 resizeTopPath()
气泡上部path
1
2
3
4
5
6
7
8
9
10
11
12
13
14
15
16
17
18
19
20
21
22
23
24
25
26
27
28
29
30
31
private fun resizeTopPath(width: Float) {
    val cornerRadius = cornerRadius.toFloat()
    val arrowWidth = arrowWidth.toFloat()
    val upperHeightNA = mUpperHeightNA
    val upperHeightHA = mUpperHeightHA
    val upperHeightFA = mUpperHeightFA

    mUpperPath.reset()

    // 设置箭头path
    mUpperPath.moveTo(arrowWidth, upperHeightFA)
    mUpperPath.lineTo(0F, upperHeightHA)
    mUpperPath.lineTo(arrowWidth, upperHeightNA)

    // 设置箭头到左上角之间的竖线path
    mUpperPath.lineTo(arrowWidth, cornerRadius)

    // 设置左上角path
    val leftTop = RectF(arrowWidth, 0F, arrowWidth + cornerRadius, cornerRadius)
    mUpperPath.arcTo(leftTop, 180F, 90F)

    // 设置顶部横线path
    mUpperPath.lineTo(width - cornerRadius, 0F)

    // 设置右上角path
    val rightTop = RectF(width - cornerRadius, 0F, width, cornerRadius)
    mUpperPath.arcTo(rightTop, 270F, 90F)

    // 设置右边竖线path
    mUpperPath.lineTo(width, upperHeightFA)
}
5.3 resizeBottomPath()
气泡下部path
1
2
3
4
5
6
7
8
9
10
11
12
13
14
15
16
17
18
19
20
21
private fun resizeBottomPath(width: Float, height: Float) {
    val cornerRadius = cornerRadius.toFloat()
    val arrowWidth = arrowWidth.toFloat()

    mLowerPath.reset()

    // 设置右下角path
    mLowerPath.moveTo(width, height - cornerRadius)
    val rightBottom = RectF(width - cornerRadius, height - cornerRadius, width, height)
    mLowerPath.arcTo(rightBottom, 0F, 90F)

    // 设置底部横线path
    mLowerPath.lineTo((arrowWidth + cornerRadius), height)

    // 设置左下角path
    val leftBottom = RectF(arrowWidth, height - cornerRadius, (arrowWidth + cornerRadius), height)
    mLowerPath.arcTo(leftBottom, 90F, 90F)

    // 设置箭头到底部的竖线path
    mLowerPath.lineTo(arrowWidth, height - cornerRadius)
}
六、重写onDraw()
定义好气泡 气泡上部path 和 气泡下部path ,就轮到 onDraw() 进行绘制了
6.1 onDraw()方法
1
2
3
4
5
6
7
8
9
10
11
12
13
14
15
16
17
18
19
20
21
22
23
24
25
26
27
28
29
30
override fun draw(canvas: Canvas, paint: Paint) {
    paint.color = solidColor // 填充颜色
    paint.style = Paint.Style.FILL // 样式为FILL
    paint.isAntiAlias = true // 抗锯齿
    paint.isDither = true    // 开启抖动模式

    // 记录画布
    canvas.save()

    // 箭头的方向,通过scale变换画布方向实现
    if (arrowDirection == DIRECTION.END) {
        canvas.scale(-1F, 1F, width / 2, height / 2)
    }

    // 绘制顶部分区域
    canvas.drawPath(mUpperPath, paint)

    // 绘制中部分区域(矩形)
    val rectF = RectF(arrowWidth.toFloat(), mUpperHeightFA, width, height - cornerRadius)
    canvas.drawRect(rectF, paint)

    // 绘制底部分区域
    canvas.drawPath(mLowerPath, paint)

    // 绘制描边
    drawStroke(canvas, paint)

    // 还原画布
    canvas.restore()
}
6.2 绘制描边
1
2
3
4
5
6
7
8
9
10
11
12
13
14
15
16
17
18
19
20
21
22
23
24
25
26
27
28
29
30
31
32
33
34
35
36
37
38
39
40
41
private fun drawStroke(canvas: Canvas, paint: Paint) {
    val strokeOffset = mStrokeOffset
    val radiusOffset = mRadiusOffset
    val cornerRadius = cornerRadius
    val arrowWidth = arrowWidth
    val upperHeightNA = mUpperHeightNA
    val upperHeightHA = mUpperHeightHA
    val upperHeightFA = mUpperHeightFA

    // 设置画笔
    paint.color = strokeColor           // 画笔颜色
    paint.style = Paint.Style.STROKE    // 画笔样式为STROKE
    paint.strokeCap = Paint.Cap.ROUND   // 笔尖绘制样式为圆形
    paint.strokeJoin = Paint.Join.ROUND // 拐角绘制样式为圆形
    paint.strokeWidth = strokeWidth.toFloat() // 描边的宽度,单位px

    // 绘制左上角和顶部描边
    val leftTop = RectF(arrowWidth + strokeOffset, strokeOffset, arrowWidth + cornerRadius - strokeOffset, cornerRadius - strokeOffset)
    canvas.drawArc(leftTop, 180F, 90F, false, paint)
    canvas.drawLine(arrowWidth + cornerRadius - radiusOffset, strokeOffset, width - cornerRadius + radiusOffset, strokeOffset, paint)

    // 绘制右上角和右边描边
    val rightTop = RectF(width - cornerRadius + strokeOffset, strokeOffset, width - strokeOffset, cornerRadius - strokeOffset)
    canvas.drawArc(rightTop, 270F, 90F, false, paint)
    canvas.drawLine(width - strokeOffset, cornerRadius - radiusOffset, width - strokeOffset, height - cornerRadius + radiusOffset, paint)

    // 绘制右下角和底部描边
    val rightBottom = RectF(width - cornerRadius + strokeOffset, height - cornerRadius + strokeOffset, width - strokeOffset, height - strokeOffset)
    canvas.drawArc(rightBottom, 0F, 90F, false, paint)
    canvas.drawLine(width - cornerRadius + radiusOffset, height - strokeOffset, arrowWidth + cornerRadius - radiusOffset, height - strokeOffset, paint)

    // 绘制右下角和左边箭头下的描边
    val leftBottom = RectF(arrowWidth + strokeOffset, height - cornerRadius + strokeOffset, arrowWidth + cornerRadius - strokeOffset, height - strokeOffset)
    canvas.drawArc(leftBottom, 90F, 90F, false, paint)
    canvas.drawLine(arrowWidth + strokeOffset, height - cornerRadius + radiusOffset, arrowWidth + strokeOffset, upperHeightFA, paint)

    // 绘制箭头和箭头上面的描边
    canvas.drawLine(arrowWidth + strokeOffset, upperHeightFA, strokeOffset, upperHeightHA, paint)
    canvas.drawLine(strokeOffset, upperHeightHA, arrowWidth + strokeOffset, upperHeightNA, paint)
    canvas.drawLine(arrowWidth + strokeOffset, mUpperHeightNA, arrowWidth + strokeOffset, cornerRadius - radiusOffset, paint)
}
七、克隆
1
override fun clone(): BubbleShape = super.clone() as BubbleShape
八、效果

最后,留下几个问题用于提高,有兴趣的读者可以自行探索:
- 绘制圆角的偏差是如何造成的?
- 如何用代码实现点击气泡时填充颜色变化的反馈?
- 如何用代码设置内边距,令内部的TextView文字与气泡整体更好融合?
相关工程: