一、介绍
1.1 功能
经过长期需求迭代、引入大量第三方代码库之后,构建的安装包包含海量方法。即便经过代码混淆,依然会在不久的将来遇到 Android64K方法数 问题。
官方对此这样解释:
Android 应用 (APK) 文件包含 Dalvik Executable (DEX) 文件形式的可执行字节码文件,这些文件包含用来运行您的应用的已编译代码。Dalvik Executable 规范将可在单个 DEX 文件内引用的方法总数限制为 65,536,其中包括 Android 框架方法、库方法以及您自己的代码中的方法。在计算机科学领域内,术语千(简称 K)表示 1024(或 2^10)。由于 65,536 等于 64 X 1024,因此这一限制称为“64K 引用限制”。
既然单个Dex文件不能容纳应用所有方法引用,应运而生解决方案:把多余的方法引用放到第二个、第三个等后续Dex文件中。方法引用越多,最终分包数量越多。
1.2 构建
添加以下配置后,代码构建时自动分包:
1
2
3
4
5
android {
    defaultConfig {
        multiDexEnabled true
    }
}
MultiDex 用于应用启动时加载被分割的子dex,让后续类加载能从子dex找到目标类。
1
implementation "androidx.multidex:multidex:2.0.0"
1.3 疑难
当然还可能会遇到:
- 启动类没有分到主包引起 ClassNotFoundException;
- 读取dex时间长导致 ANR 提示;
这些问题网上很多文章都有提及,自行查找就有解决方案。更详细的说明可以参考官方文档:为方法数超过 64K 的应用启用多 dex 文件。
为提高文章阅读性和不影响理解的前提,下文移除部分日志并微调代码格式,插图可以浏览器右键打开查看。
二、集成
最简单方式是继承 MultiDexApplication 类。
如果不方便继承父类,可以选择在自定义的 Application.attachBaseContext(Context base) 里主动调用 MultiDex.install(this);
1
2
3
4
5
6
7
8
9
public class MultiDexApplication extends Application {
    public MultiDexApplication() {
    }

    protected void attachBaseContext(Context base) {
        super.attachBaseContext(base);
        MultiDex.install(this);
    }
}
三、提取
3.1 IS_VM_MULTIDEX_CAPABLE
Android4.4(API19) 获取 System.getProperty(“java.vm.version”) 结果为 1.6.0。
1
2
private static final boolean IS_VM_MULTIDEX_CAPABLE =
  isVMMultidexCapable(System.getProperty("java.vm.version"));
3.2 install()
上文提到的 MultiDex.install(this); 调用以下方法:
1
2
3
4
5
6
7
8
9
10
11
12
13
14
15
16
17
18
19
20
21
22
23
24
25
26
public static void install(Context context) {
    if (IS_VM_MULTIDEX_CAPABLE) {
        // 如果VM本身已经支持分包就不需要调用MultiDex,因为安装过程已完成相同操作
        Log.i("MultiDex", "VM has multidex support, MultiDex support library is disabled.");
    } else if (VERSION.SDK_INT < 4) {
        // 最低支持API4
        throw new RuntimeException("MultiDex installation failed. SDK " + VERSION.SDK_INT
                                   + " is unsupported. Min SDK version is " + 4 + ".");
    } else {
        try {
            // 获取应用的信息
            ApplicationInfo applicationInfo = getApplicationInfo(context);
            if (applicationInfo == null) {
                return;
            }

            // 开始装载操作
            doInstallation(context,
                           new File(applicationInfo.sourceDir),
                           new File(applicationInfo.dataDir),
                           "secondary-dexes", "", true);
        } catch (Exception var2) {
            throw new RuntimeException("MultiDex installation failed (" + var2.getMessage() + ").");
        }
    }
}
3.3 doInstallation()
调用 doInstallation() 开始装载操作:
1
2
3
4
5
6
7
8
9
10
11
12
13
14
15
16
17
18
19
20
21
22
23
24
25
26
27
28
29
30
31
32
33
34
35
36
37
38
39
40
41
42
43
44
45
46
47
48
49
50
51
52
53
54
55
56
57
58
59
60
61
62
63
64
65
66
67
68
69
70
71
72
73
74
75
76
77
78
private static void doInstallation(Context mainContext, File sourceApk, File dataDir,
                                   String secondaryFolderName, String prefsKeyPrefix,
                                   boolean reinstallOnPatchRecoverableException)
  throws IOException, IllegalArgumentException, IllegalAccessException,
         NoSuchFieldException, InvocationTargetException, NoSuchMethodException,
         SecurityException, ClassNotFoundException, InstantiationException {

    // 加锁保证安装线程安全
    synchronized(installedApk) {
        // 检查本应用apk文件是否已装载
        if (!installedApk.contains(sourceApk)) {
            installedApk.add(sourceApk);

            // 类加载器
            ClassLoader loader;
            try {
                // 获取类加载器,提取的Dex后续通过反射添加到类加载器
                loader = mainContext.getClassLoader();
            } catch (RuntimeException var25) {
                // 如果运行在测试模式,有可能出现获取ClassLoader失败
                return;
            }

            if (loader == null) {
                // 如果运行在测试模式,有可能出现获取ClassLoader为空
            } else {
                try {
                    clearOldDexDir(mainContext);
                } catch (Throwable var24) {
                    // Something went wrong when trying to clear old MultiDex extraction
                    // continuing without cleaning.
                }

                // dataDir: /data/data/com.phantomvk.playground
                // secondaryFolderName: secondary-dexes
                // dexDir: /data/data/com.phantomvk.playground/code_cache/secondary-dexes
                File dexDir = getDexDir(mainContext, dataDir, secondaryFolderName);

                // sourceApk: /data/app/com.phantomvk.playground-1.apk
                // dexDir: /data/data/com.phantomvk.playground/code_cache/secondary-dexes
                // 同时创建文件锁 MultiDex.lock
                MultiDexExtractor extractor = new MultiDexExtractor(sourceApk, dexDir);
                IOException closeException = null;

                try {
                    // 从MultiDexExtractor加载dexes获得zipList
                    List files = extractor.load(mainContext, prefsKeyPrefix, false);

                    try {
                        // 加载获取Dexes安装到ClassLoader
                        installSecondaryDexes(loader, dexDir, files);
                    } catch (IOException var26) {
                        if (!reinstallOnPatchRecoverableException) {
                            throw var26;
                        }

                        // 加载失败重试,从MultiDexExtractor加载dexes获得zips
                        files = extractor.load(mainContext, prefsKeyPrefix, true);

                        // 加载获取的Dexes安装到ClassLoader
                        installSecondaryDexes(loader, dexDir, files);
                    }
                } finally {
                    try {
                        // 解除文件锁
                        extractor.close();
                    } catch (IOException var23) {
                        closeException = var23;
                    }
                }

                if (closeException != null) {
                    throw closeException;
                }
            }
        }
    }
}
变量 dexDir 调试路径:

进入 MultiDexExtractor.load 提取器获取列表
1
2
3
4
5
6
7
8
9
10
11
12
13
14
15
16
17
18
19
20
21
22
23
24
25
26
27
28
29
30
List<? extends File> load(Context context, String prefsKeyPrefix,
                          boolean forceReload) throws IOException {

    if (!this.cacheLock.isValid()) {
        throw new IllegalStateException("MultiDexExtractor was closed");
    } else {
        List files;
        // 如果不是'强制提取'和'文件已被修改'就尝试复用文件
        if (!forceReload && !isModified(context, this.sourceApk, this.sourceCrc, prefsKeyPrefix)) {
            try {
                // 复用缓存在dexDir的Dexes文件
                files = this.loadExistingExtractions(context, prefsKeyPrefix);
            } catch (IOException var6) {
                // 复用缓存出现错误,重新提取文件
                files = this.performExtractions();
                // 最后执行的数据会保存到SharedPreferences
                putStoredApkInfo(context, prefsKeyPrefix, getTimeStamp(this.sourceApk),
                                 this.sourceCrc, files);
            }
        } else {
            // 更新App后sourceCrc改变会触发dex重新提取
            files = this.performExtractions();
            // 最后执行的数据会保存到SharedPreferences
            putStoredApkInfo(context, prefsKeyPrefix, getTimeStamp(this.sourceApk),
                             this.sourceCrc,files);
        }

        return files;
    }
}
3.4 MultiDexExtractor.performExtractions()
实际执行的提取操作方法:
1
2
3
4
5
6
7
8
9
10
11
12
13
14
15
16
17
18
19
20
21
22
23
24
25
26
27
28
29
30
31
32
33
34
35
36
37
38
39
40
41
42
43
44
45
46
47
48
49
50
51
52
53
54
55
56
57
58
59
60
61
62
63
64
65
66
67
68
69
70
71
72
73
74
75
76
77
private List<MultiDexExtractor.ExtractedDex> performExtractions() throws IOException {
    // extractedFilePrefix: com.phantomvk.playground-1.apk.classes
    String extractedFilePrefix = this.sourceApk.getName() + ".classes";

    this.clearDexDir();
    List<MultiDexExtractor.ExtractedDex> files = new ArrayList();

    // APK本质是Zip,所以APK用Zip类型打开
    ZipFile apk = new ZipFile(this.sourceApk);

    try {
        // 名为classes.dex的主dex安装过程已完成提取
        // 运行时只从classes2.dex开始遍历,即secondaryNumber=2
        int secondaryNumber = 2;

        // apk作为zip文件打开后,可从zip文件列表中获取指定文件名dex
        // 从apk内逐个获取dex文件,把dex文件写为zip文件
        for(ZipEntry dexFile = apk.getEntry("classes" + secondaryNumber + ".dex");
            dexFile != null;
            dexFile = apk.getEntry("classes" + secondaryNumber + ".dex")) {

            // fileName: com.phantomvk.playground-1.apk.classes2.zip
            String fileName = extractedFilePrefix + secondaryNumber + ".zip";

            // MultiDexExtractor.ExtractedDex父类File,存放提取的dex文件
            // dexDir: /data/data/com.phantomvk.playground/code_cache/secondary-dexes/
            MultiDexExtractor.ExtractedDex extractedFile =
                new MultiDexExtractor.ExtractedDex(this.dexDir, fileName);
            files.add(extractedFile);

            // 每个dex提取失败累计重试最多3次
            int numAttempts = 0;
            boolean isExtractionSuccessful = false;

            while(numAttempts < 3 && !isExtractionSuccessful) {
                ++numAttempts;

                // 提取dexFile(如classes2.dex)为extractedFile
                // 意思就是读取dex并保存到zip里面
                extract(apk, dexFile, extractedFile, extractedFilePrefix);

                try {
                    // 记录提取后文件的CRC
                    extractedFile.crc = getZipCrc(extractedFile);
                    isExtractionSuccessful = true;
                } catch (IOException var18) {
                    isExtractionSuccessful = false;
                }

                // 提取失败则删除提取出来的文件
                if (!isExtractionSuccessful) {
                    extractedFile.delete();
                }
            }

            // 任意dex提取失败3次终止App启动流程
            if (!isExtractionSuccessful) {
                throw new IOException("Could not create zip file "
                    + extractedFile.getAbsolutePath()
                    + " for secondary dex (" + secondaryNumber + ")");
            }

            // 完成本次提取执行++secondaryNumber,继续遍历余下dex
            ++secondaryNumber;
        }
    } finally {
        try {
            apk.close();
        } catch (IOException var17) {
            Log.w("MultiDex", "Failed to close resource", var17);
        }

    }

    // 返回提取出来的zip列表
    return files;
}
流程概括:
- 用读取 zip 的方式读取 APK;
- 提取除了 classes.dex 外的其他 classesN.dex 文件到 MultiDexExtractor.ExtractedDex;
- 每个 classesN.dex 文件对应一个 MultiDexExtractor.ExtractedDex,后者类型为 zip;
- 记录提取后 MultiDexExtractor.ExtractedDex 的 CRC;
- 返回 MultiDexExtractor.ExtractedDex 文件列表;
提取完成后的 files 结构如下,可见子dex总共有4个,文件类型为 zip,保存在 dexDir 文件夹下面:

3.5 MultiDexExtractor.extract()
这里介绍如何从 dex 转换为列表 files 里保存的 zip:
1
2
3
4
5
6
7
8
9
10
11
12
13
14
15
16
17
18
19
20
21
22
23
24
25
26
27
28
29
30
31
32
33
34
35
36
37
38
39
40
41
42
43
44
45
46
47
// @param apk 安装包源文件apkName.apk
// @param dexFile 安装包源文件解压获得的classes2.dex、classes3.dex等等
// @param extractTo 提取某个dex保存到对应Zip文件
// @param extractedFilePrefix 提取出来文件前缀
private static void extract(ZipFile apk, ZipEntry dexFile, File extractTo, String extractedFilePrefix) throws IOException, FileNotFoundException {
    // 为dex文件创建InputStream
    InputStream in = apk.getInputStream(dexFile);
    ZipOutputStream out = null;

    // tmpFileName:   tmp-com.phantomvk.playground-1.apk.classes.zip
    // extractParent: /data/data/com.phantomvk.playground/code_cache/secondary-dexes/
    File tmp = File.createTempFile("tmp-" + extractedFilePrefix, ".zip", extractTo.getParentFile());

    try {
        // 包装temp文件创建ZipOutputStream
        out = new ZipOutputStream(new BufferedOutputStream(new FileOutputStream(tmp)));

        try {
            // 每个zip文件名不一样,但是zip里面的dex都命名为classes.dex
            ZipEntry classesDex = new ZipEntry("classes.dex");
            classesDex.setTime(dexFile.getTime());
            // 每个zip压缩包保存一个子文件dex
            out.putNextEntry(classesDex);
            byte[] buffer = new byte[16384]; // 16KB缓冲区

            // 从dex文件输入流in,写到zip文件输出流out
            for(int length = in.read(buffer); length != -1; length = in.read(buffer)) {
                out.write(buffer, 0, length);
            }

            out.closeEntry();
        } finally {
            out.close();
        }

        if (!tmp.setReadOnly()) {
            throw new IOException("Failed to mark readonly \"" + tmp.getAbsolutePath() + "\" (tmp of \"" + extractTo.getAbsolutePath() + "\")");
        }

        if (!tmp.renameTo(extractTo)) {
            throw new IOException("Failed to rename \"" + tmp.getAbsolutePath() + "\" to \"" + extractTo.getAbsolutePath() + "\"");
        }
    } finally {
        closeQuietly(in);
        tmp.delete();
    }
}
流程概括:
- 先创建临时文件 tmp-[包名]-1.apk.classes.zip;
- 在上述临时 zip 压缩包内创建文件 classes.dex;
- 从 APK 复制 dex 并写入到 zip 的 classes.dex 中;
- 最后把临时 zip 文件重命名为 extractTo 文件的文件名 [包名]-1.apk.classesN.zip;
四、装载
上文只完成从安装包获得dexes,逐一提取 zip 文件到磁盘的工作,提取完成的文件并还没有添加到 ClassLoader。
4.1 installSecondaryDexes()
继续调用 installSecondaryDexes 进行装载,根据不同版本进入不同分支:
1
2
3
4
5
6
7
8
9
10
11
12
13
14
15
16
17
18
private static void installSecondaryDexes(ClassLoader loader,
                                          File dexDir,
                                          List<? extends File> files)
  throws IllegalArgumentException, IllegalAccessException, NoSuchFieldException,
InvocationTargetException, NoSuchMethodException, IOException,
SecurityException, ClassNotFoundException, InstantiationException {

    // 提取zip文件列表不为空
    if (!files.isEmpty()) {
        if (VERSION.SDK_INT >= 19) {
            MultiDex.V19.install(loader, files, dexDir);
        } else if (VERSION.SDK_INT >= 14) {
            MultiDex.V14.install(loader, files);
        } else {
            MultiDex.V4.install(loader, files);
        }
    }
}
用 Android4.4 作为示例进入 V19:
APK 每个 dex 已经逐个提取为 MultiDexExtractor.ExtractedDex 文件,合并为文件列表后传递给变量 additionalClassPathEntries。
1
2
3
4
5
6
7
8
9
10
11
12
13
14
15
16
17
18
19
20
21
22
23
24
25
26
27
28
29
30
31
32
33
34
35
36
37
38
39
40
41
42
43
44
45
46
47
// additionalClassPathEntries: MultiDexExtractor.ExtractedDex 文件列表
// optimizedDirectory: /data/data/[包名]/code_cache/secondary-dexes/,即dexDir
static void install(ClassLoader loader, List<? extends File> additionalClassPathEntries, File optimizedDirectory)
  throws IllegalArgumentException, IllegalAccessException,
         NoSuchFieldException, InvocationTargetException,
         NoSuchMethodException, IOException {

    // dalvik.system.DexPathList dalvik.system.BaseDexClassLoader.pathList
    Field pathListField = MultiDex.findField(loader, "pathList");
    Object dexPathList = pathListField.get(loader);

    ArrayList<IOException> suppressedExceptions = new ArrayList();

    // 1. makeDexElements()优化zip为Element对象;
    // 2. expandFieldArray()里把Element对象存入ClassLoader;
    MultiDex.expandFieldArray(dexPathList, "dexElements",
                              makeDexElements(dexPathList, new ArrayList(additionalClassPathEntries),
                                              optimizedDirectory, suppressedExceptions));

    // 下面是异常情况的处理,可以忽略
    if (suppressedExceptions.size() > 0) {
        Iterator var6 = suppressedExceptions.iterator();

        while(var6.hasNext()) {
            IOException e = (IOException)var6.next();
            Log.w("MultiDex", "Exception in makeDexElement", e);
        }

        Field suppressedExceptionsField = MultiDex.findField(dexPathList, "dexElementsSuppressedExceptions");
        IOException[] dexElementsSuppressedExceptions = (IOException[])((IOException[])suppressedExceptionsField.get(dexPathList));
        if (dexElementsSuppressedExceptions == null) {
            dexElementsSuppressedExceptions = (IOException[])suppressedExceptions.toArray(new IOException[suppressedExceptions.size()]);
        } else {
            IOException[] combined = new IOException[suppressedExceptions.size() + dexElementsSuppressedExceptions.length];
            suppressedExceptions.toArray(combined);
            System.arraycopy(dexElementsSuppressedExceptions, 0, combined,
                             suppressedExceptions.size(),
                             dexElementsSuppressedExceptions.length);
            dexElementsSuppressedExceptions = combined;
        }

        suppressedExceptionsField.set(dexPathList, dexElementsSuppressedExceptions);
        IOException exception = new IOException("I/O exception during makeDexElement");
        exception.initCause((Throwable)suppressedExceptions.get(0));
        throw exception;
    }
}
流程概括:
- 反射 ClassLoader 获取变量 pathList;
- makeDexElements() 逐个优化包含 dex 的 zip 文件,再封装到 Element 实例中;
- 从 pathList 反射获取 dexElements[],读取原有文件;
- dexElements[] 已有文件和步骤2封装的 Element 文件合并为新 Elements[];
- MultiDex.expandFieldArray() 执行新 Elements[] 替换 dexElements[];
4.2 makeDexElements()
dexPathList 和 optimizedDirectory 作为参数调用 makeDexElements()。DexPathList 声明在类 BaseDexClassLoader
1
2
3
4
public class BaseDexClassLoader extends ClassLoader {
    private final DexPathList pathList;
    ....
}
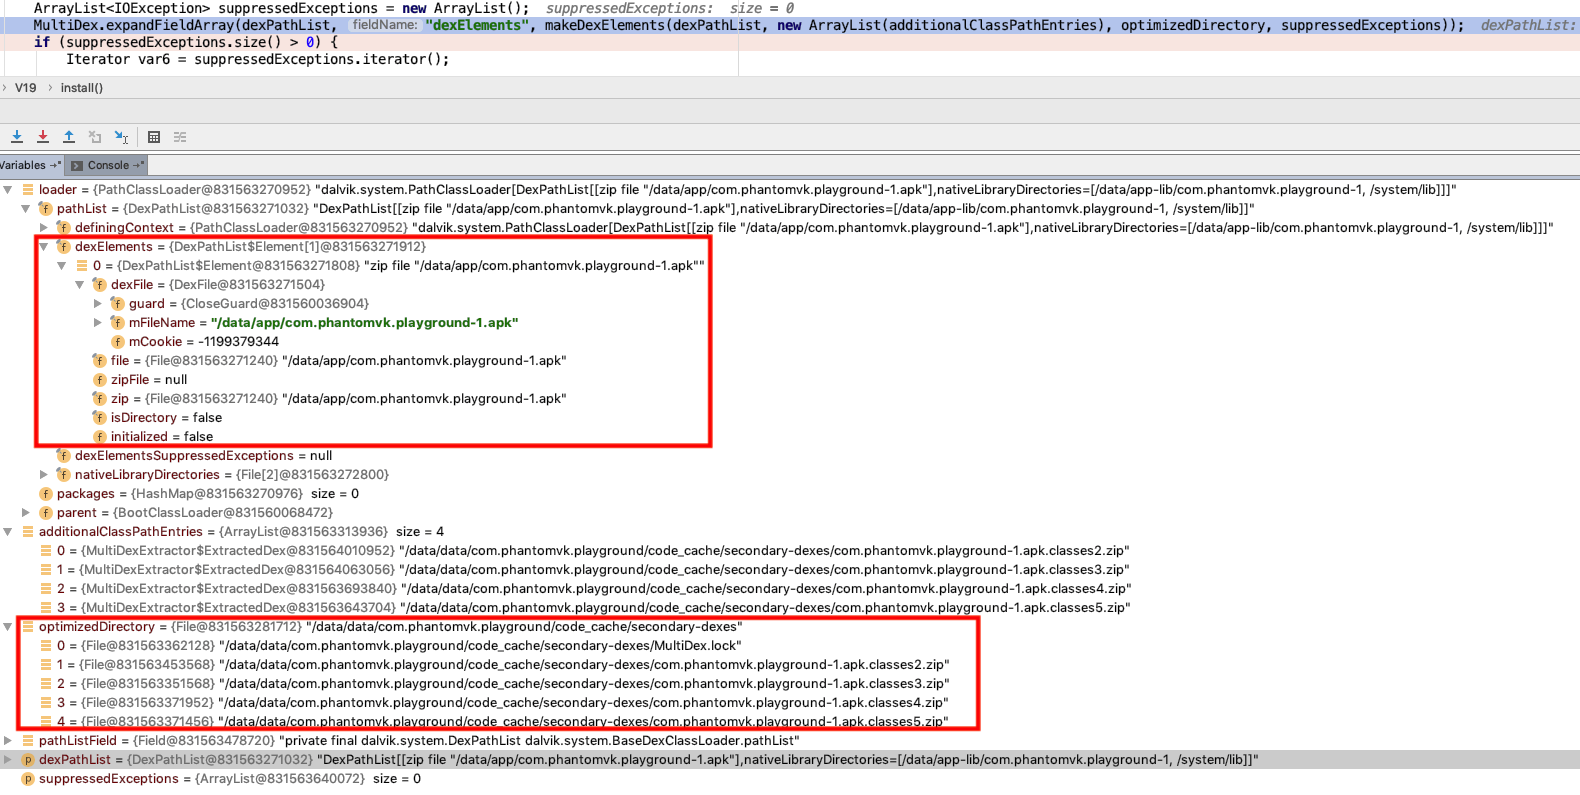
dexPathList 变量运行时内存结构:

optimizedDirectory 变量运行时内存结构:

下面实例的这个是 V19.makeDexElements(),反射调用 DexPathList.makeDexElements()
1
2
3
4
5
6
7
8
9
10
11
12
13
14
15
private static Object[] makeDexElements(Object dexPathList,
                                        ArrayList<File> files,
                                        File optimizedDirectory,
                                        ArrayList<IOException> suppressedExceptions)
  throws IllegalAccessException, InvocationTargetException, NoSuchMethodException {

    // 反射获得DexPathList.makeDexElements()方法
    Method makeDexElements = MultiDex.findMethod(dexPathList, "makeDexElements",
                                                 ArrayList.class, File.class, ArrayList.class);

    // 调用上述反射获取的方法把zip列表转换为Element[]
    return (Object[])((Object[])makeDexElements.invoke(dexPathList, files,
                                                       optimizedDirectory,
                                                       suppressedExceptions));
}
makeDexElements(ArrayList, File, ArrayList) 位于类 DexPathList
1
2
3
4
5
6
7
8
9
10
11
12
13
14
15
16
17
18
19
20
21
22
23
24
25
26
27
28
29
30
31
32
33
34
35
36
37
38
39
40
41
42
43
44
45
46
47
48
49
50
// Makes an array of dex/resource path elements, one per element of the given array.
private static Element[] makeDexElements(ArrayList<File> files, File optimizedDirectory,
                                         ArrayList<IOException> suppressedExceptions) {
    ArrayList<Element> elements = new ArrayList<Element>();

    // 遍历files
    for (File file : files) {
        File zip = null;
        DexFile dex = null;
        String name = file.getName();

        if (name.endsWith(DEX_SUFFIX)) {
            // 原生dex文件且不是放在zip/jar里面
            try {
                dex = loadDexFile(file, optimizedDirectory);
            } catch (IOException ex) {
                System.logE("Unable to load dex file: " + file, ex);
            }
        } else if (name.endsWith(APK_SUFFIX) || name.endsWith(JAR_SUFFIX)
                || name.endsWith(ZIP_SUFFIX)) {
            // 因为传入的文件都是zip后缀,所以进入这个分支
            zip = file;

            try {
                // 调用loadDexFile()方法,看下文
                dex = loadDexFile(file, optimizedDirectory);
            } catch (IOException suppressed) {
                 // IOException might get thrown "legitimately" by the DexFile constructor if the
                 // zip file turns out to be resource-only (that is, no classes.dex file in it).
                 // Let dex == null and hang on to the exception to add to the tea-leaves for
                 // when findClass returns null.
                suppressedExceptions.add(suppressed);
            }
        } else if (file.isDirectory()) {
            // We support directories for looking up resources.
            // This is only useful for running libcore tests.
            elements.add(new Element(file, true, null, null));
        } else {
            System.logW("Unknown file type for: " + file);
        }

        if ((zip != null) || (dex != null)) {
            // 优化后的DexFile封装到Element
            elements.add(new Element(file, false, zip, dex));
        }
    }

    // ArrayList to Array.
    return elements.toArray(new Element[elements.size()]);
}
把 zip 所在文件夹传到方法。zip 文件封装为 DexFile 过程会调用 原生代码 进行优化。
1
2
3
4
5
6
7
8
9
10
11
12
13
14
15
16
// Constructs a {@code DexFile} instance, as appropriate depending
// on whether {@code optimizedDirectory} is {@code null}.
private static DexFile loadDexFile(File file, File optimizedDirectory)
        throws IOException {

    // 从上文可知optimizedDirectory非空
    if (optimizedDirectory == null) {
        return new DexFile(file);
    } else {
        // 传入zip所在文件夹路径,计算dex优化后的保存路径
        String optimizedPath = optimizedPathFor(file, optimizedDirectory);

        // DexFile构建过程会优化源码,优化后文件保存在optimizedPath
        return DexFile.loadDex(file.getPath(), optimizedPath, 0);
    }
}
为 zip 文件里面的 dex 提供优化后的保存路径
1
2
3
4
5
6
7
8
9
10
11
12
13
14
// Converts a zip file path of an extracted secondary dex to an output file path for an
// associated optimized dex file.
private static String optimizedPathFor(File path) {
    // Any reproducible name ending with ".dex" should do but lets keep the same name
    // as DexPathList.optimizedPathFor

    File optimizedDirectory = path.getParentFile();
    String fileName = path.getName();
    String optimizedFileName =
            fileName.substring(0, fileName.length() - EXTRACTED_SUFFIX_LENGTH)
            + MultiDexExtractor.DEX_SUFFIX;
    File result = new File(optimizedDirectory, optimizedFileName);
    return result.getPath();
}
流程概括:
- 已知每个 zip 包含一个 dex 文件,为每个 dex 计算优化后产物的路径;
- 而 MultiDexExtractor.ExtractedDex 就是 zip;
- 然后用 ExtractedDex 通过 DexFile 类交给 JNI 去优化,优化产物会保存在上述路径;
- 优化完成的 DexFile 后封装为 Element 对象,并收集到 Element[];
- Element[] 拓展上文说的 dexElements[];
4.3 expandFieldArray()
original[] 存放已经加载的主dex,extraElements[] 存放需要新增的子dex。
具体步骤:
- 通过反射 dexElements[] 获取 original[];
- 合成 original[] + extraElements[] 获得 combined[];
- 用 combined[] 反射替换 dexElements[];
1
2
3
4
5
6
7
8
9
10
11
12
13
14
15
16
17
18
19
20
21
22
23
// Replace the value of a field containing a non null array, by a new array containing the
// elements of the original array plus the elements of extraElements.
// @param instance the instance whose field is to be modified.
// @param fieldName the field to modify.
// @param extraElements elements to append at the end of the array.
private static void expandFieldArray(Object instance, String fieldName,
        Object[] extraElements) throws NoSuchFieldException, IllegalArgumentException,
        IllegalAccessException {
    // dexPathList获取makeDexElements的Field
    Field jlrField = findField(instance, fieldName);

    // 从实例获取Field的实际值original
    Object[] original = (Object[]) jlrField.get(instance);

    // 混合original[]和新的extraElements[]为combined[]
    Object[] combined = (Object[]) Array.newInstance(
            original.getClass().getComponentType(), original.length + extraElements.length);
    System.arraycopy(original, 0, combined, 0, original.length);
    System.arraycopy(extraElements, 0, combined, original.length, extraElements.length);

    // 用combined[]覆盖原original[]
    jlrField.set(instance, combined);
}
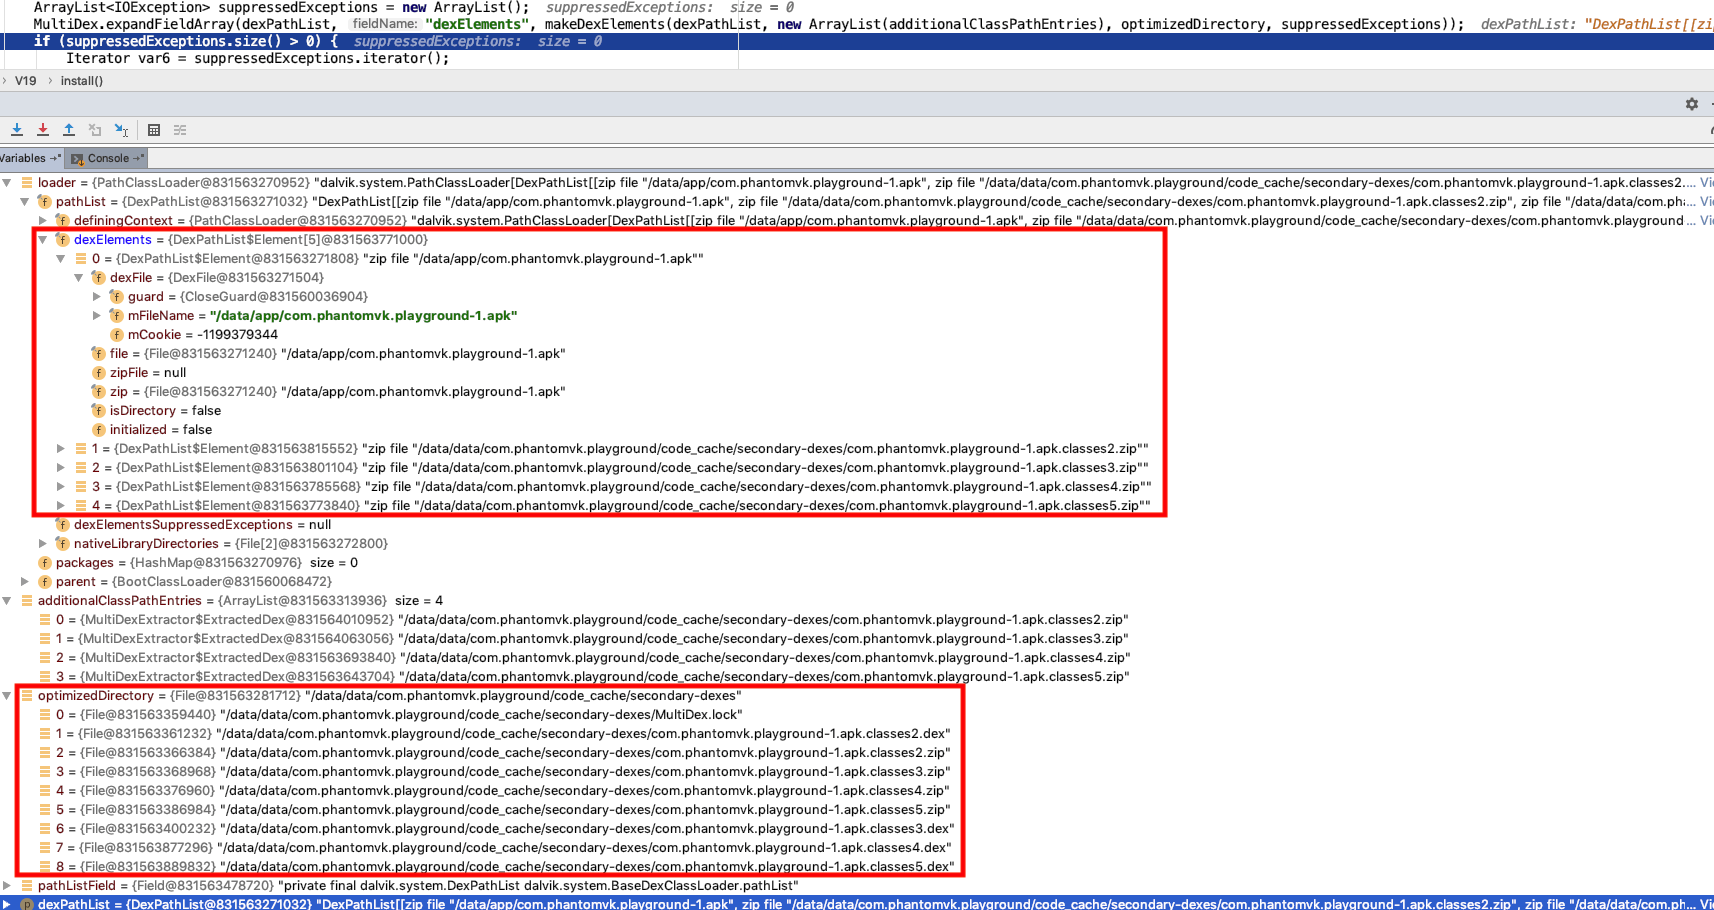
调用 expandFieldArray() 前 dexElements 只有主dex:

调用 expandFieldArray() 后新增4个子dex:

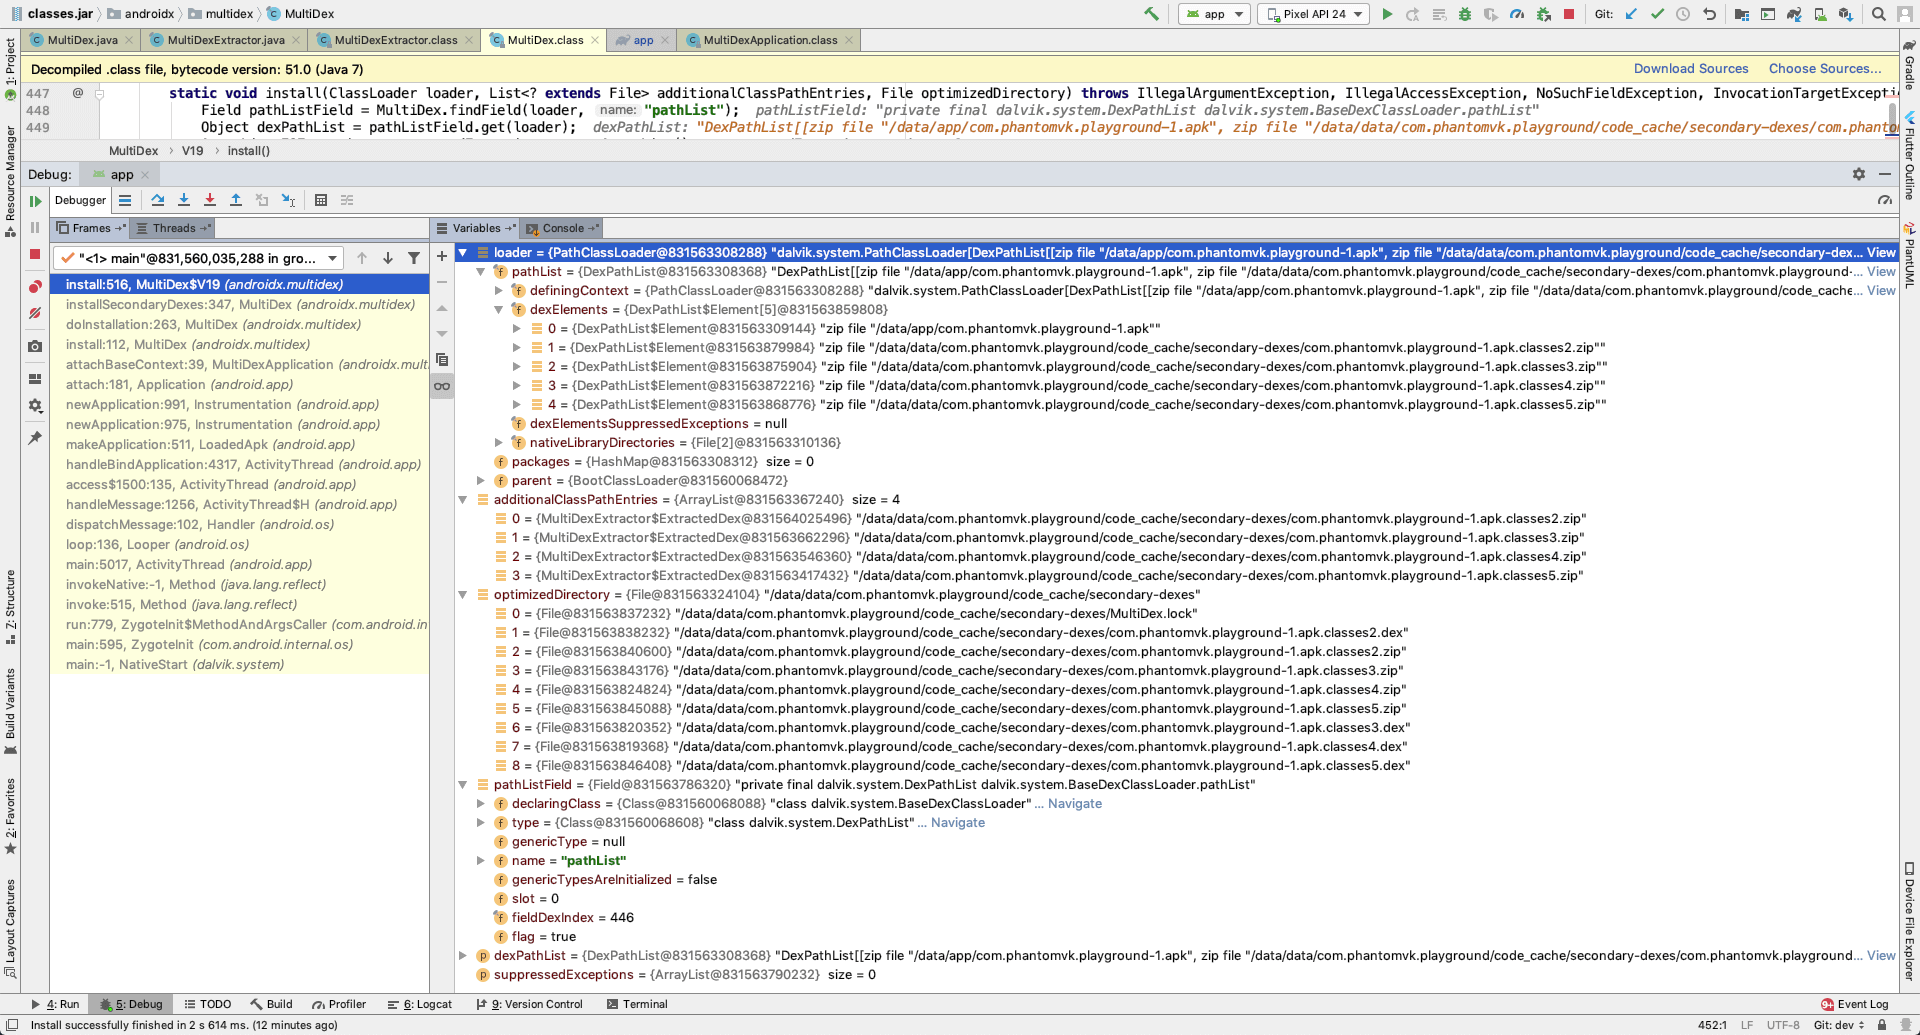
提取工作完成后内存布局,optimizedDirectory 增加的几个 dex 文件是优化后的产物:

4.4 putStoredApkInfo()
提取成功的dexes信息保存到 SharedPreferences 以便下次重用。
1
2
3
4
5
6
7
8
9
10
11
12
13
14
15
16
17
18
19
20
21
22
// 只能在获取文件锁LOCK_FILENAME之后才能调用
private static void putStoredApkInfo(Context context, String keyPrefix, long timeStamp,
        long crc, List<ExtractedDex> extractedDexes) {

    SharedPreferences prefs = getMultiDexPreferences(context);
    SharedPreferences.Editor edit = prefs.edit();

    edit.putLong(keyPrefix + KEY_TIME_STAMP, timeStamp); // 时间戳
    edit.putLong(keyPrefix + KEY_CRC, crc); // CRC检验码
    edit.putInt(keyPrefix + KEY_DEX_NUMBER, extractedDexes.size() + 1); // dex数量

    int extractedDexId = 2;
    for (ExtractedDex dex : extractedDexes) {
        // 记录每个子dex的CRC和最后修改时间
        edit.putLong(keyPrefix + KEY_DEX_CRC + extractedDexId, dex.crc);
        edit.putLong(keyPrefix + KEY_DEX_TIME + extractedDexId, dex.lastModified());
        extractedDexId++;
    }

    // 同步写入磁盘
    edit.commit();
}
五、总结
为规避首次启动解析dex时间过长的问题,个人有以下建议:
- 尽可能提高混淆强度,减少代码和方法使用量;
- 只使用一次的方法手动合并到调用点,相当于内联;
- 尽可能把代码存放在主dex,让提取工作在安装过程完成;
- 不常用功能使用动态加载,让安装时间和提取时间都减少;
虽然 Android5.0 及后期系统使用 ART 虚拟机,在安装过程会全部或部分优化dex,再也不会在应用启动时影响体验。但是减少代码量,即使只能降低安装时长也总归是好事。
六、资料
抖音BoostMultiDex优化实践:Android低版本上APP首次启动时间减少80%(一)
抖音BoostMultiDex优化实践:Android低版本上APP首次启动时间减少80%(二)